Introduction
Every year, construction sites across the US rely on over 300,000 excavators to dig foundations, trench utility lines, and grade terrain. These machines move tons of earth with precision that no other equipment can match, making them essential for contractors, landscapers, and utility workers.
For beginners, excavators look intimidating. Multiple joysticks, complex hydraulics, and 20+ tons of machinery create a steep learning curve.
One wrong move can damage underground utilities, tip the machine, or injure workers nearby.
This guide walks through exactly how to operate an excavator from pre-start checks to shutdown. You'll learn the control systems, master basic maneuvers, and build the safe habits that separate competent operators from dangerous ones. Whether you're entering the construction trades or expanding your equipment skills, this is your roadmap to confident, safe excavator operation.
Key Takeaways
- Pre-operation checks (fluids, tracks, hydraulics, attachments) prevent breakdowns and costly delays
- Control pattern confusion (ISO vs. SAE) causes 90% of beginner operator errors—verify yours first
- Proper warm-up and cool-down sequences extend machine life by 30-40%
- Keep personnel 10+ feet beyond swing radius to avoid struck-by incidents (leading cause of excavator fatalities)
- Smooth control inputs improve fuel efficiency by 15% and reduce component wear
When Should You Use an Excavator?
Excavators are purpose-built for digging, trenching, grading, demolition, and material handling tasks where precision and 360-degree rotation are essential.
Their hydraulic systems deliver the power to break through hard soil, while their rotating upper structure allows stationary digging and loading without repositioning the machine.
Ideal excavator applications include:
- Foundation excavation for buildings and structures
- Utility trenching for water, sewer, gas, and electrical lines
- Site clearing and grading for new construction
- Loading trucks with soil, gravel, or demolition debris
- Demolition work with specialized attachments
- Landscaping projects requiring precision digging
For some jobs, other machines deliver better performance:
When to choose alternatives:
- Backhoes for lighter work requiring frequent travel between dig sites
- Dozers for large-scale grading and pushing material over distance
- Skid steers for tight spaces where a compact footprint matters more than dig depth
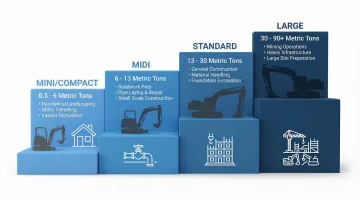
Excavators range from mini excavators (1-6 tons) for residential landscaping to large excavators (20+ tons) for commercial construction. Manufacturers classify machines by operating weight:
- Mini/compact models: Under 6-7 metric tons
- Midi models: 7-10 tons
- Standard excavators: 10-45 tons
- Large machines: Exceeding 45 tons
Choosing the right size affects transport logistics, ground pressure, lifting capacity, and operational costs.
What You Need Before Operating an Excavator
Operator Requirements
Before touching the controls, you need proper preparation. OSHA standard 29 CFR 1926.602(d) mandates that excavator operators complete three-part training: formal instruction, practical hands-on training, and workplace evaluation.
While specific certification requirements vary by state and employer, many job sites require third-party credentials from organizations like the National Commission for the Certification of Crane Operators (NCCCO). Operating excavators requires sustained focus, physical stamina to manipulate controls for hours, and mental preparedness—one moment of distraction can cause catastrophic accidents.
Prerequisites Checklist
Personal protective equipment (mandatory):
- Hard hat
- Steel-toed boots
- High-visibility vest
- Work gloves
- Safety glasses
Site assessment (complete before starting):
- Underground utilities marked by calling 811
- Utilities can sit just inches below the surface, making even shallow digging hazardous
- Ground stability verified for the machine's weight
- Obstacles identified and cleared from the work area
- Safe working radius established with barriers or spotters
Equipment verification:
- Correct excavator size for the job requirements
- Appropriate bucket or attachment properly installed
- Operator's manual accessible for reference
Pre-Operation Inspection Requirements
OSHA 1926.602(a) requires daily safety inspections before every shift—a legal mandate designed to identify unsafe conditions before they cause accidents.
Critical inspection items:
- Fluid levels: Engine oil, hydraulic fluid, coolant, and fuel
- Tracks/tires: Check for wear, damage, and proper tension
- Hydraulic lines: Inspect for leaks, cracks, or damaged fittings
- Safety features: Verify seat belt function, ROPS (Rollover Protective Structures) integrity, and mirror visibility
- Braking systems: Test that service brakes can stop and hold the machine fully loaded
- Audible alarms: Confirm horn and backup alarm operation
Once you've mastered these operational fundamentals, selecting the right equipment becomes the next priority.
When you're ready to purchase equipment, Mideast Equipment Supply offers inspected used excavators through auctions and direct sales across multiple U.S. locations. Financing options through CIT and multiple lenders make acquiring the right machine more accessible, with monthly payments starting as low as $266 depending on equipment value.
Understanding Excavator Controls and Components
Control Patterns: ISO vs. SAE
The two primary control standards—ISO and SAE—reverse critical joystick functions, making it essential to verify which pattern you're using before operation.
ISO Controls (International Standard):
- Right joystick: Boom up/down and bucket curl in/out
- Left joystick: Stick in/out and swing left/right
- Defined by ISO 10968, this is the global standard used on most modern machines
SAE Controls (North American Traditional):
- Right joystick: Stick in/out and bucket curl in/out
- Left joystick: Boom up/down and swing left/right
- Defined by SAE J1177, common on older U.S. equipment
Many excavators feature a pattern changer valve to switch between modes, but operators must verify the active pattern before starting work.
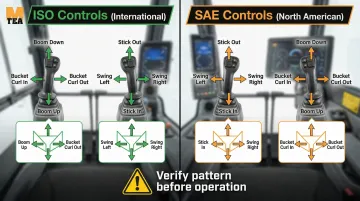
Muscle memory from one pattern will cause dangerous mistakes if you accidentally operate in the other mode.
Control Layout Breakdown
Beyond the primary joysticks, understanding the full control layout ensures safe, efficient operation.
Travel controls:
- Foot pedals or hand levers control track movement
- Push both forward to travel straight ahead
- Pull both back to reverse
- Push one forward while pulling the other back to turn
Auxiliary controls:
- Throttle adjusts engine RPM
- Blade control (if equipped) raises/lowers the stabilizer blade
- Auxiliary hydraulics power attachments like breakers or grapples
Key Components
Excavators consist of three main assemblies working together.
Upper structure:
- Operator cab with controls and instrumentation
- Engine and hydraulic pumps
- Counterweight for stability
- Swing mechanism enabling 360-degree rotation
Working attachment:
- Boom (main arm extending from the cab)
- Stick or dipper (secondary arm)
- Bucket or specialized attachment
- Hydraulic cylinders controlling each component
Undercarriage:
- Tracks or wheels providing mobility
- Final drives transferring power to tracks
- Blade (on some models) for stability during digging
How to Operate an Excavator Step-by-Step
Master these steps in sequence before operating any excavator. Skipping startup procedures or rushing through checks causes equipment damage and creates the safety hazards that lead to job site accidents.
Setup and Pre-Start
- Complete your circle check inspection covering all items from the prerequisites section
- Enter the cab safely using three points of contact (two hands and one foot, or two feet and one hand)
- Adjust the seat for comfortable reach to all controls without straining
- Fasten your seat belt—OSHA mandates seat belt use on all covered equipment
- Adjust mirrors for clear visibility around the machine
- Verify the control pattern matches your training (ISO or SAE)
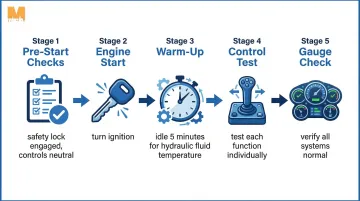
Starting the Engine and Initial Checks
- Ensure all control levers are in neutral and the safety lock bar is engaged
- Turn the key to start the engine
- Idle the engine for 5 minutes—manufacturers explicitly require this warm-up period to bring hydraulic fluid to operating temperature and prevent component damage
- Test each control individually with the bucket off the ground:
- Boom up and down
- Stick in and out
- Bucket curl in and out
- Swing left and right
- Check all gauges to confirm oil pressure, coolant temperature, and hydraulic temperature are in normal operating range
Basic Travel and Positioning
- Position yourself facing the "front" of the machine (the side with the blade)
- Practice basic travel movements:
- Push both travel controls forward to move straight
- Pull both back to reverse
- Push one forward while pulling the other back to turn
- Keep the boom low and centered over the tracks when traveling. This maintains stability.
- Travel slowly on slopes or uneven terrain—always keep the heavy end (blade or counterweight) facing uphill
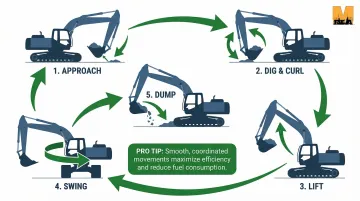
Performing Work Operations
Once you've mastered travel and positioning, you're ready to begin actual digging and material handling.
- Position the excavator with tracks perpendicular to the trench or dig area for maximum stability
- Lower the blade to the ground to create a stable platform and add counterweight
- Angle the bucket teeth at 30-45 degrees after extending the stick—this angle ensures efficient soil penetration
- Use smooth, coordinated movements:
- Curl the bucket while pulling the stick back
- Raise the boom to lift the load
- Swing gradually toward the dump location
- Position over the dump site, open the bucket to release material, then return to dig position
Why technique matters: Smooth, coordinated movements increase productivity by 30% compared to jerky, uncoordinated operation.
Operating at 200-300 RPMs below maximum engine speed cuts fuel consumption by 10% while maintaining work output—a simple adjustment that reduces operating costs significantly.
Shutdown and Securing
- Move to level ground and lower the bucket flat to the surface
- Center the boom over the tracks
- Reduce engine to idle and let it run for 5 minutes—this cool-down prevents turbocharger damage by allowing hot components to cool gradually
- Engage the safety lock bar to deactivate hydraulic controls
- Turn off the engine and remove the key
- Complete a post-operation walk-around checking for leaks, damage, or loose components
Safety Best Practices and Common Mistakes to Avoid
Critical Safety Practices
Maintain 360-degree awareness:
- Check mirrors and physically look before swinging the cab
- The tail swing (counterweight) creates a blind spot that can strike people or objects
- Maintain at least three feet of clearance between the rotating superstructure and obstacles
Never exceed rated capacities:
- Operating beyond lift capacity or maximum reach specifications can cause tipping
- Utility strikes remain a persistent threat, with 196,977 unique damages reported in 2024 alone
Establish clear work zones:
- Keep all personnel at least 10 feet beyond maximum reach
- Use a spotter when working near traffic, utilities, or confined spaces
- Never allow anyone to stand under the boom, arm, or bucket
Operate safely on slopes:
- Keep the heavy end (counterweight) uphill when traveling
- Never dig or lift heavy loads on the downhill side where tipping risk is highest
- While machines may physically climb steep grades, engine lubrication systems often limit continuous operation to 45 degrees to prevent engine damage from inadequate lubrication

Beyond these fundamental safety rules, new operators frequently make avoidable mistakes that compromise both safety and equipment performance.
Common Beginner Mistakes to Avoid
Skipping the warm-up period:
- Operating before hydraulic fluid reaches proper temperature causes jerky movements and damages seals and cylinders
- Always idle for 5 minutes before work and before shutdown
Operating too aggressively:
- Fast, jerky control movements reduce precision, waste fuel, and accelerate component wear
- Smooth, gradual movements improve accuracy and equipment longevity
Neglecting the safety lock:
- Always lower the bucket and engage the safety lock before exiting the cab
- Accidental control bumps create crush hazards
Ignoring ground conditions:
- Don't dig too close to excavation edges where the machine could slide
- Verify soil stability before working—unstable ground causes tip-overs
Conclusion
Operating an excavator safely comes down to disciplined habits: thorough inspections, smooth movements, constant awareness, and respect for the machine's capabilities and limitations.
The controls themselves are straightforward once you understand the pattern, but developing the judgment to work efficiently while maintaining safety margins takes practice.
Beginners should seek hands-on training and practice in controlled environments before tackling complex jobs. Experienced operators make it look easy because they've built muscle memory through hundreds of hours of practice. Start with smaller machines, master the fundamentals, and gradually progress to larger equipment as your skills develop.
As your skills progress, having access to the right equipment becomes essential. Whether you're purchasing your first excavator or expanding your fleet, working with experienced dealers ensures you get equipment that matches your needs and budget. Mideast Equipment Supply specializes in used excavators with nationwide access to inventory across multiple U.S. locations, offering financing options to help contractors and construction companies acquire the equipment they need.
Frequently Asked Questions
Do I need certification to operate an excavator?
OSHA requires employer-provided training and evaluation, though specific requirements vary by state and job site. Many employers prefer third-party certification from organizations like NCCCO.
What's the difference between ISO and SAE controls?
ISO and SAE swap the left and right joystick functions—ISO is the global standard, while SAE is traditional in North America. Stick with one pattern to avoid dangerous muscle memory confusion.
How long does it take to learn excavator operation?
Basic competency develops in 1-2 weeks of training, but true proficiency requires 6-12 months of regular operation to build the coordination and judgment needed for complex tasks and challenging job sites.
Can I switch between ISO and SAE controls?
Most machines allow switching, but avoid it unless you've been trained on both systems. Muscle memory will cause wrong movements and create serious safety risks.
What's the most common mistake new excavator operators make?
Rushing through pre-operation checks and operating with aggressive, jerky control movements are the top mistakes. Both compromise safety and equipment longevity, while smooth, deliberate operation improves precision and reduces wear.
Should I start with a mini excavator or full-size excavator?
Beginners should start with mini excavators (under 10 tons) to learn fundamental controls and coordination in a more forgiving platform before progressing to larger machines where mistakes have greater consequences.